


Written by our forum member: Shelley
Lets get it started!

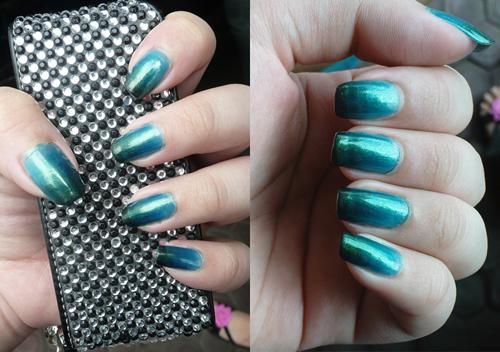
What you need is a dark and opaque polish, a lighter polish, a sheer polish, extra time and extra patience and then layer everything on top of each other. For this tutorial, I wear the following accordingly:
- Revlon in black lingerie *it’s quite sheer for a black polish*
- Elianto in Deep Sea Green *it’s also quite sheer and it chaps easily*
- NYX in Jungle *love the teal color, but it’s super sheer, I need five layers to make the opaque colour to look like the one in the bottle*.
When you have everything line u, here’s what you need to do:


- Base coat. I wear Dodo perfume nail care for base. Base coat is necessary because it prevents the pigment to sink into your nail.
- Apply the darkest or most opaque colour on your tip only. I wear the black one. You don’t need to apply it correctly because you are going to layer it anyway.
- Apply the second color on top of the black, a bit far from the tip until the middle of the nail. You might want to layer it a few times, and just like the black one, you don’t have to apply it super neat.
- Apply the most sheer colour on top of the middle colour and keep layering until the end of your nail.

Voila…you get a DIY gradient nail. Easy, right? Just remember that you don’t have to apply the base colour super neat and then make sure the top layer is already dried before you apply another layer. Feel free to experiment with soft or bright shade, glittery or shimmery…whatever fancy your mood 😉
